Less than meets the eye: Useful filters for landscape photography
The idea of a general discussion on using filters for landscape photography came to me while working on the recent article about the polariser. Here's to explore the topic further and provide some advice on applying filters in practice as well as replicating some of their effects during post-processing.

You may want to rotate your phone in order to improve your browsing experience on this site.
Quick links
Skylight filter: Against untrue blue
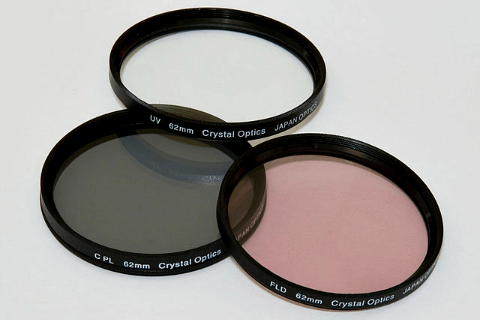
Photography filters – as far as landscape photography is concerned – seem to disappear from the scene rather rapidly, which is a pity. The skylight filter is one of the few still around.
It is most commonly used in landscape photography to prevent bluish haze forming around distant objects like mountains. The effect is caused by scattered light reflected from the sky, thus the moniker.
When made of glass, the filter will also reduce the amount of UV light reaching the lens. Both filter effects result in a slightly warmer rendering of the final image.
The most useful application of the skylight filter, though, lies in the protection it provides for the lens behind it. For this alone, the filter is well worth keeping attached to each of your lenses, especially as it won't cost you a fortune.
The filter has no effect on exposure and will work in combination with other, often more expensive filters, protecting them as well if needed.
Need one?
Browse skylight filters on Amazon.com
Browse skylight filters on Amazon.ca
Browse skylight filters on Amazon.co.uk
Neutral density filter: Shades for your lens
I briefly mentioned the filter in the introduction article on tips for landscape photographers. If your camera doesn't have one built-in, consider adding some of its variety to your gear. The filter gets often denoted as ND grey.
The ND filter usually comprises a round piece of glass or plastic tinted in some shade of grey. Its declared purpose is to trap, or absorb, the light before it can enter the lens. The darker the filter, the more light gets prevented from reaching the lens, and the longer exposure time becomes available/is required to capture a scene.
This is the main idea behind the filter: to allow for slower shutter speeds, especially in combination with wider apertures. The more or less standard filter grade is -3 EV, guiding one eighth of the available light to the lens. This is also the most common value for neutral density filters built into cameras.
There are much more extreme – and accordingly expensive – varieties, like -9 EV grade filter, capable of day-for-night cinema effects with its transmission factor of less than 0.2%.
Can you verify the last number?
Need one?
Browse neutral density filters on Amazon.com
Browse neutral density filters on Amazon.ca
Browse neutral density filters on Amazon.co.uk
Graduated filter: In praise of smooth transitions
Related to the neutral density family and often carrying its signature "ND" in the name, the graduated filter features a smooth transition from transparent to dark grey across its surface.
The idea is to place the dark end along the upper part of the lens to prevent blown highlights in the sky when exposing for the lower, shadowy part of the image unaffected by filter's transparent end. The graduation makes sure that no hard edges scar the image, and keeps the overall contrast at bay.
Graduated filters have been in use by landscape photographers for decades. They actually haven't lost any of their importance. After all, the sky is still brighter than the rest of the landscape when someone fetches her camera to take a shot. However, the filter becomes a rarity, slowly but surely.
The decline probably owes something to usability. The filter isn't a screw-on type. It isn't even round. A square plate made of glass or gelatine is held in place by two sliding guides. The guides themselves are attached to an adapter screwed onto the lens. This isn't exactly a construction you'd flip around shot for shot.
The usual proceedings require mounting the camera on a tripod, composing and framing the image, then exactly aligning the filter according to the scene, i.e., moving it up and down to cover the brightest area of the sky with filter's own darkest region.
At this time and age, who's got the nerve? Aside from a few professional photographers and dedicated amateurs… You guess.
Need one?
Browse graduated filters on Amazon.com
Browse graduated filters on Amazon.ca
Browse graduated filters on Amazon.co.uk
How to imitate above photography filters
The bad news is, hardly! If filters mentioned above were absent when you took the image, there's little you can do in post-processing, especially after you managed to knock your bare lens against a tree on location (keyword "skylight").
The good news is, if you exposed for the sky, you'll be able to use the gradient tool for a graduated filter in Photoshop to recover the shadows. Follow the steps below:
- Duplicate the background layer and select the copy as your working layer.
- Change blending mode to Screen and opacity to around 40%.
- Add an empty mask to the working layer. Make sure the mask is selected in the layer overview.
- Select standard colours, black on white, and flip them to use white as foreground colour on black background.
- Choose the gradient tool, linear gradient, and foreground to background colour transition.
- Now, position your cursor at the bottom of your image and drag a straight vertical line up to the horizon, or slightly above it.
- The masked sky should return to its previous look, while the rest of the image should become brighter, with a smooth transition between the two regions.
- Experiment with opacity level until you are happy with the result. Pay attention to not overdo it by introducing too much noise.
This technique works as well every time you want to lift shadows in some part of your image. For example, use radial gradient out of the image centre to get rid of heavy vignetting in the corners.
Tags: #landscapephotography #lensfilters #photogear
Other landscape photography equipment
- Cameras best suited for landscape photography
- Following the thread about what is most important for landscape photography equipment, let's discuss some worthwhile options.
- Landscape photography ♥ panoramic cameras
- Ever wanted to try one? Read about your current options!
- How to choose a camera lens
- Everything you need to know when looking for a new camera lens, in one place: manufacturers, mounts, formats, types, and how to understand all those mystic lens labels.
- Understanding digital camera lenses – and their reviews
- Understand how to tell good digital camera lenses from the rest when reading their reviews.
- Best camera lenses for landscape photography
- The last article on camera lenses presents some fine choices for selected cameras.
- Filters for landscape photography
- Learn how to use most useful landscape photography filters!
- Polarising filter
- One of the most striking photography filters available is hard to imitate and easy to master. Try it!
Tell me what you think!
Is it useful 👍? Awful 👎? Leave a message! Your comments help make this site better (and give me a kick—one way or another).
Popular articles
-
A kind of magic
If a digital picture has to be seen in the real world, printed on a real medium and displayed in a real showcase, its transition from RAW to real is better done in an old school image editor. Enter A…
-
A duck for a dog
If you got your own place on the Internet, helping your visitors find what they are looking for is a great way to engage them and keep them staying a bit longer. A custom site search can achieve just …
-
"Might as well have the best"
Aiming for better images? Think better lenses! This is your most important piece of gear, so you better get it sorted out. — Need some advice?
 Become a patron for