Adobe Photoshop Tips and Tricks:
In Plain Light 04.18 – The Magic Issue
Welcome to another newsletter! In this issue: Adobe Photoshop tips and tricks that work.
You may want to rotate your phone in order to improve your browsing experience on this site.

Quick links
- Photoshop layers and masks
- Use channels for selective editing
- Convert images to black and white
- Sharpen images in Photoshop
- Further links
Image (post)processing has lately been shifting towards RAW data editing. No doubt, this is the way to go with images meant to stay digital only.
If a picture taken in RAW is going to be only presented onscreen, there is little sense editing it in a pixel-based application.
However, if this same picture should end up in the real world, printed on a real medium and displayed in a real showcase, its transition from RAW to real is better done on the pixel level, in an old school image editor.
Enter Adobe Photoshop.
There are many image editors around nowadays, so you are not required to use Photoshop. But if you do use it—and pay for the privilege—you'd better know how to get the most out of it. Wouldn't you agree?
This tips and tricks collection is planned to stay a work in progress, to be refreshed with new ideas from time to time. Bookmark the page and visit often to remain up to date.
A piece of cake

Let's start… with the dessert.
No, we haven't mixed the menu up. For one, you can never go wrong with a cake. And then, its layered structure is at the heart of Photoshop's data model.
Photoshop image files, just like those sweet creamy-biscuit monsters, can—and should—consist of several layers. The analogy ends here, though. Photoshop layers are much more powerful, even if not on a calorie scale.
Basic recipe
Have a brief look at the layer palette in Photoshop, with one of your images opened. If it only has one entry for Background, you are missing on many good things the application has to offer.
To open a great new world, no, a whole new universe, of possibilities, select Layer > New > Layer from Background… or Layer > Duplicate Layer… from the menu.
You can change the layer description to something telling, or leave it as is to save the time.
This is it, you have just created a new layer in your cake, er, file.
So what, you may ask. Right on!
Well, you can start editing this copy while leaving the original in the background intact, for instance. This alone was worth the exercise, in my opinion.
Stack up your ideas!

Of course, this is just the beginning. With Photoshop layers you can
- change the blending mode, that is, the way an upper layer affects the one just below—be sure to play with dozens of options in the dropdown list
- adjust the opacity, i.e., how strong the layer effect should be
- and finally, select areas for the layer to take effect while excluding others from doing so (masking)
These possibilities let you create infinite versions of your image, even in the same file—by turning some layers on or off, i.e., making them visible or not.

In the end, your image may look very different from a solid cake, but the idea is just the same.
You start building your image from the (back)ground up, with the original as a platter.

Every new layer adds to the evolving dish…

…until something new is born before your very eyes.

Special task layers
If you spend some time testing different blending modes, you might notice that some of them are very well suited for particular tasks.
For example, Screen lends itself to lightening the image, be it for overall tone correction or just to counterbalance vignetting.
Conversely, Multiply can be used to darken the image, or to add/strengthen vignetting in its parts for a special "vintage" look and feel.
Adjustment layers
Unlike standard layers consisting of real pixels, adjustment layers define a function, or a transformation method, applied to the image data underneath.
As such, adjustment layers are very light-weight. At the same time, they offer powerful editing options, from Levels and Curves (to correct or enhance exposure) to Color Balance and Channel Mixer (for refined black-and-white conversion, for example).
To add an adjustment layer to your image, click on the black-and-white circle at the bottom of the layer palette, and choose from the long list of options.
Hide-and-seek with layer masks

Layer masks offer a simple way to limit the layer effect by only applying it in selected areas of the image.
A mask is a greyscale image linked to the image layer. Like with a real mask, the darker this image gets, the less from the layer leaks through it to the layers below, hence, the subtler layer effect is on the underlying layers in the area.
Black parts of the mask prevent the layer from acting altogether, while white sectors make it work to the full.
Creating a mask
To add a mask to the layer, select the latter in the palette and choose Layer > Layer Mask > Reveal All in the menu to start with an empty, all-white mask, or Layer > Layer Mask > Hide All for a full, all-black mask.
A great shortcut for defining a mask is creating it from a selection. Switch to any layer to make a meaningful selection in every possible way avaible in Adobe Photoshop:
- Marquee Tool
- Lasso Tool
- Quick Selection or Magic Wand Tool
- Select > Color Range
- Select > Focus Area
- …
Modify the selection to your liking—refining or feathering edges may be a good idea. Then select a layer in which to apply the mask and choose Layer > Layer Mask > Reveal/Hide Selection from the menu.
Editing the mask
Once created and selected in the layer palette, the mask can be modified in dozens of ways. Be sure to set the foreground colour to a shade of grey, then
- draw freehand or with any tools
- use the Gradient Tool (from one grey tone to another)
- use the Paint Bucket Tool (for selections in intermediate grey tones)
- …
In the end
The combination of layers, masks, and different blending options ensures just about every image manipulation is possible with Adobe Photoshop.
Consider for example this picture:

Its file is made up of the following layers:
- background
- background copy with blemishes and scanning artifacts tidied up
- Levels adjustment layer
- isolated red channel monochrome layer (invisible)
- isolated green channel monochrome layer with layer mask applied (invisible)
- monochrome layers merged together, set to Luminosity blending and 60% opacity
For presentations, the saved image is resized and then sharpened applying the technique described in the final part.
Channel hopping

You learned how Photoshop organizes data in its files by placing different layers atop of each other and mixing their parts into the final blend.
Every layer in this model, except for adjustment ones, can be considered an independent image whose pixels are encoded just in the same way as in the composite whole.
For RGB images, this would mean "separated by three colour channels".
These channels are visible, and can be explored from the dedicated palette in the Photoshop layer pane. What is little known, you can also edit them one by one after selecting them there.
Every Photoshop drawing tool can be applied on just a single channel, of course, within the greyscale tone range.
You might ask what this could be possibly good for. Fair enough!
I find it increasingly useful for fighting large, irregular colour distortion areas, such as flare and film development artifacts [the latter caused, for example, by stains from washing the film after fixing it].
My version of Photoshop had appeared before Healing Brush came into existence, so I have to rely on Stamp to get rid of small blemishes, or duplicating selections for something larger, that is, if I am lucky to find a region with similar colours and luminosity.
The process is somewhat tedious but well worth trying, as it can lead to a surprising outcome in many a hopeless situation.
Here's a sketchy outline of how I go around it:
- select a channel
- choose the Dodge tool and a large soft brush, depending on the area you have to deal with
- set the effect to a couple per cent—literally, 2-3% should be enough
- start drawing, trying to blend the affected area with its surroundings
- reduce the brush size to fine-tune your work
- don't draw for too long at a time—create some useful waypoints in the history to return to, just in case
- repeat for two other channels
- assess the result in full colour—if needed, return to single channels and make corrections with both Dodge and Burn tools.
This is it. With some practice, you can achieve truly incredible results—in a very short time.
Paint it black, and white, and in-between

If you are still after precise and sober aesthetics of classic black-and-white images, or want to try your hand at it "for real", Adobe Photoshop should be your tool of choice.
To begin with, there are several options converting images to black and white in Photoshop.
 Start with any image…
The fastest is choosing Image > Mode > Grayscale from the menu. Confirm that you want to remove the colour information from your image to do exactly that—you will get a thoroughly desaturated, and often flat, copy of your picture.
 …convert to greyscale…
A different—subtler and much less destructive—method would be adding a Hue/Saturation adjustment layer to your image and setting its Saturation to -100.
 …desaturate…
Another, far less known possibility is changing the image mode to Lab colour: Image > Mode > Lab Color.
The menu command converts image data into the Lab colour space. When done, switch to the channel palette and delete all channels but Luminosity, by selecting them one by one and dragging into the paper bin at the palette bottom.
While similar in handling and only insignificantly more complex, the results are well worth the extra time. The overall tonality is well balanced and very pleasing, and as a nice side effect, the image noise seems to disappear, too, just like this!
 …extract Lab luminosity channel…
To continue editing the image from here, convert it back to Grayscale, then RGB via respective menu commands.
I strongly recommend, no, I urge you, to try the Lab mode when converting to black and white in Photoshop.
Otherwise, and for the greatest control possible, combine several Channel Mixer adjustment levels to achieve the ultimate freedom with black-and-white image conversion.
Try it first: add a Channel Mixer adjustment layer, and tick the Monochrome check box.
Start with assigning 100% to a single colour channel, leaving other two at 0. Change the assignment to a different channel, and notice the difference.
You can change the distribution among channels simply by double-clicking the layer icon in the palette stack.
Now try several different distributions of available 100% between the three colour channels. Compare the results.
 Contrasts • Val de Moiry, Valais, Switzerland
…or use the Channel Mixer
You can settle for a single setting which best fits your image. Or, you can opt for several selective adjustments, made possible with different layers and suitable masks, additionally aided by modified opacities, to create a unique look and feel for every of your images.
The possibilities of this advanced approach are endless. By practising and applying it, you can create black-and-white images which could have never come out of a darkroom.
Make 'em shine: Sharpening up your pictures

This topic is more on the advanced side, so feel free to skip the discussion until the very end. However, understanding it is essential for making your images looking good when printed at any size. If you ever plan to show your images offline, this is a good starting and orientation point.
This text is based on a tutorial "Image Sharpening-Make it Really Sharp" by Jeff Schewe. An advertising photographer for over thirty years, he was on the inside of Photoshop development and testing and helped guide and direct its many features since Photoshop 4.0.
Jeff's intimate knowledge of the application led him to become a member of the Pixel Genius team who created a very useful plug-in toolkit to work with Photoshop and later with Photoshop CS and CC.
Unfortunately, the group ceased their commercial operations in 2018. The original sharpening tutorial seems to have been taken offline, too.
“This stuff isn't rocket science… rocket science is a lot easier…”
Jeff Schewe
Having mentioned that, the step-by-step process described in the end is a clear path to better looking prints.
Why sharpen at all?
Every technology has its limitations, and photography is no exception, digital or not.
It starts with image capture. Our lenses are imperfect, as is the medium to which they lead the light, be it grainy film or a sensor with a fixed grid of pixels.
In the vast majority of modern cameras, each pixel only records information from a single colour channel, relying on the in-camera software to fill the literal gaps with an educated guess.
This guessing can result in quite pronounced colour and pattern artifacts. To counterbalance the effect, many a camera would place a thin [low-pass, or anti-aliasing] filter before its sensor, deliberately blurring the whole image for the sake of its problematic areas.
More issues arise when the final image gets printed. In addition to converting its pixels into a different colour space [RGB to CMYK], they also need to turn into dots of ink or dye—another possible source of softness. Besides, every printing device is only capable to reproduce a certain fine detail level. Image sharpening, thus, has to adjust to every output.
Bullet points:
- sharpness is compromised by technology limitations on every step in the image lifecycle
- individual sharpening is required for every image output and depends on print size, output medium, and used device

Sharp and sharper
Our eyes evaluate sharpness of an image by examining surface edges within it. The more neighbouring surfaces stand out from each other, that is, the more contrasty edges between them appear to us, the sharper the overall image seems in our perception.
This principle is at the core of the standard sharpening method in Photoshop, its Unsharp Mask filter (Filter > Sharpen > Unsharp Mask…). The idea is to make pixels on the light side of an edge a bit lighter and those on the dark side a bit darker, and thus the edge itself more prominent, since more contrasty.
The problem with the filter is, it has no idea where actual edges are in the image. So, while it will increase our perception of sharpness, it will also exaggerate noise, and possibly create other artifacts in areas without edges.
The filter parameters, Amount (the process strength, in per cent), Radius (the distance both sides from a supposed edge where to apply the process, in pixels), and Threshold (the number of tone levels used to identify the areas to process), offer little in terms of fine-tuning. Applied globally, the Unsharp Mask will inevitably hurt some areas.
The ideal sharpening would only be directed at areas which can benefit from it, and prevented (masked) in all others.

A smarter Unsharp Mask
If you want to sharpen original camera captures in Photoshop, be it in order to correct focusing glitches, improve in-camera JPEGs, or just for the fun of it, here is Jeff Schewe's advice on how to do it the smart way.
- In the Channel palette, select the Green channel and choose Duplicate Channel… from its context menu. Remember how you name it.
This additional channel doesn't change the appearance of your image—its only purpose is to keep the mask which we will use elsewhere.
- With the channel copy selected, run the Find Edges filter from the menu (Filter > Stylize > Find Edges). Notice that this will find noise and other artifacts as well.
- Expand edges by applying the Median filter (Filter > Noise > Median…) with the amount of 1-3, depending on file dimensions and edge width.
- Use the Levels command (Image > Adjustments > Levels, or Ctrl/Cmd+L) to darken the edges by sliding the black triangle to the right.
 Image edges found and accentuated
Notice how film grain gets intensified as well
- Apply Gaussian Blur (Filter > Blur > Gaussian Blur…) at about 1.5-3 pixels to soften the edges.
- Invert the colours to get the final mask with the edges featured in white (Image > Adjustments > Invert, or Ctrl/Cmd+I):
 Resulting edge mask to use for selective sharpening
As with any mask, the lighter an area, the more it will be affected
- Now for the fun part to actually use the mask: Start with switching to the Layer palette and duplicating your [background] image layer (Layer > Duplicate Layer…).
- Set the blending mode to Luminosity and the opacity to some value in the middle, around 50-75%.
- Load your edge mask as a selection under Select > Load Selection… The mask channel will magically appear in the dropdown list of the pop-up dialog.
- Run the Unsharp Mask (Filter > Sharpen > Unsharp Mask…) setting the amount to the maximum, the radius to 1 pixel, and leaving the threshold at 0.
- Assess the effect at 50% screen zoom. If needed, adjust the layer opacity, or go back one step and reapply the Unsharp Mask with different settings (Alt+Ctrl/Cmd+F).
This is how it could look like in the end:


These are actual screen captures from Photoshop saved as 85% JPEGs
To fine-tune areas that need further attention in terms of sharpening, apply the Unsharp Mask filter anew and add a hiding mask to the layer. Then select a large soft brush and unmask the sensitive areas by painting them free with white colour.
* * *
I must confess that I rarely use the above method in my workflow. I mostly edit my [scanned film] pictures "as is", skipping sharpening to the very end.
The main reason is, I don't need my images sharp before they are ready. Then I sharpen them exactly to the task, e.g., for screen presentation at 1200 px, or for a large photo print 1.8 m/6 ft long.
 Pole position • Glacier de Moiry, Valais, Switzerland
This is the above image in its final rendering, sharpened for this occasion
This output sharpening process is described in the section below.
The last touch: How to sharpen for the output
The following is an easy to follow step-by-step workflow which does deliver—just don't expect much of an explanation along the way. Take it as some kind of Photoshop magic, quite fitting for the holiday season ;)
Be sure to execute the steps after your image is ready for the output!
The screenshots below are from my German version of Photoshop 6.0. They will most definitely be different in your application. Don't let this confuse you! Rather, use the text for guidance and screenshots for illustration only.
- Start with flattening the image (Layer > Flatten Image) and resizing it to its output dimensions. For the latter, select Image > Image Size… from the menu. Clear the Resample Image checkbox and set the Document Size to your intended output size.

Photoshop CC has a different Image Size dialog, but it should be clear how to go about it. Remember: anything that changes original image dimensions is not what you are after!
- Duplicate the background layer (Layer > Duplicate Layer…), leave the blending mode at Normal and reduce the Opacity to 66%.
- Run the Unsharp Mask filter (Filter > Sharpen > Unsharp Mask…) at a moderate amount with a threshold of 3-6 levels put in. The latter is depending on the noise in your image and intended to prevent it from over-sharpening.

- Immediately go to Edit > Fade…, set the Opacity to 50% and the Mode to Luminosity.

- Now switch to the Layer palette and change the blending mode to Overlay. The image will take on a quite harsh contrast, but you will fix this in a moment.
- Finally, run the High Pass filter (Filter > Other > High Pass…) at about 2 pixels. Set your screen zoom to 50% to assess the effect and adjust the sharpening layer opacity as needed.


Screenshots at 50% zoom for intended print size of 180 cm
This is the image featuring in the example:

Bonus track
Another kind of magic, liveTags: #inplainlight #phototips #photoshop #imageworkflow #sharpening
Unattributed images on this page are sourced from public domain via Pixabay.
✨
Other photography tips
- Landscape photography composition tips
- Your mastery of photography composition is what ultimately makes your images. Read here how to excel at it in order to engage your viewers!
- Black & white landscape photography
- Black-and-white photography is very much alive, and landscapes in black and white still look as stunning as in Ansel Adams's day. Be sure to check the article if you'd like to try your hand at this classic and fascinating technique.
- Landscape photography equipment essentials
- Looking for a new camera or another piece of gear? Find answers to your questions, along with some advice and recommendations!
- Fine art photography prints
- And now for something completely different… My thoughts and advice on choosing and using fine art photography prints.
- How to photograph waterfalls
- If your waterfall images are not up to the expectations of your friends, nor to your own satisfaction, try these easy to follow tips to make them shine!
- Marketing fine art photography
- This newsletter issue is about creating your brand and marketing your work, told by those who've been there and done exactly that.
- What is legal to photograph outdoors
- Ever thought about copyright laws having two sides? Your photography can violate them, too. Be sure to know what to photograph, where without getting into trouble.
- How to use Photoshop
- In a dedicated newsletter issue, join me as I show how I use Photoshop to edit my images, and learn some funny facts about the application while at it.
- Wildlife photography tips
- No purchase necessary: Learn how to photograph wildlife for best possible results with your usual equipment.
- Art seascapes
- As November closes in, we take Ishmael's, of Moby Dick, advice and get to sea as soon as we can, led by some highly inspirational examples.
- Winter landscape photography tips
- "Winter landscape" may not sound as exciting as, say, "summer beach", not to everybody, for sure. But if it does to you, there is much to discover outdoors in this time of the year, too. Dress warmly and come on outside!
- Best Adobe Photoshop tips
- We recall some Photoshop basics, like layers, and proceed with more advanced topics, like masks, selective channel editing, converting colour to black and white, and output sharpening.
Other resources
- Pixel Genius PhotoKit plug-ins
- If you use Photoshop, this set of tools can save you a lot of time. The developers, which included professional photographers and members of the Adobe Photoshop testing team, offer them now completely free. Hurry up to download them as long as the site is still online.
- Martin Evening Photography
- Online presence of the Pixel Genius team member and author of the best-selling book series Adobe Photoshop for Photographers, since the version 5.0 (20 years and counting).
- Mac Holbert's Advanced Series videos
- Mac Holbert, a Pixel Genius team member, presents an ongoing video tutorial series on the Epson Print Academy YouTube channel.
- Seth Resnick Photography
- Another professional photographer and member of the Pixel Genius team. Digital Photo Destinations, co-founded by Seth, offer photography workshops in exotic places all over the world.
- Digital Dog (Andrew Rodney)
- Named a "Top 40 Photoshop Expert", Andrew Rodney of Pixel Genius offers a training, consulting and service business dedicated to digital imaging, electronic photography, color management, and Adobe Photoshop.
- Jeff Schewe Photography
- An online showcase of works by Jeff Schewe—the sharpening tutorial author.
Previous issue
- 03.18 – The weather issue: How to forecast weather
- For those who enjoy—or suffer—planning ahead. Learn how a small Swiss company manages to forecast weather in every place in the world just by studying their own forecasts from the past, why this works, and how you can benefit from their results.
Following issue
- 01.19 – The love issue: Best Valentine's Day songs
- From Europe with love: Listen to unforgettable tunes of the 60s, 70s, and 80s in a ready-to-celebrate playlist!
Tell me what you think!
Is it useful 👍? Awful 👎? Leave a message! Your comments help make this site better (and give me a kick—one way or another).
Popular articles
-
A kind of magic
If a digital picture has to be seen in the real world, printed on a real medium and displayed in a real showcase, its transition from RAW to real is better done in an old school image editor. Enter A…
-
A duck for a dog
If you got your own place on the Internet, helping your visitors find what they are looking for is a great way to engage them and keep them staying a bit longer. A custom site search can achieve just …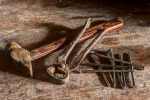
-
"Might as well have the best"
Aiming for better images? Think better lenses! This is your most important piece of gear, so you better get it sorted out. — Need some advice?
 Become a patron for